Setup of the Raspberry Pi
I took a new Raspberry Pi (a B+, but I’m certain a B will work), installed Raspbian (using NOOBS) and setup the Wifi, which was a simple task. The setup of the get_iplayer software was not so easy, but I eventually found https://github.com/get-iplayer/get_iplayer/wiki/raspbian which explained it excellently. Once I had got get_iplayer active, I turned my attention to the web-pvr interface.As I envisaged not having to login to the Pi, I set the web interface to accept connections from anywhere:
sudo nano /etc/default/get_iplayer_web_pvrWarning: the web-pvr has a note saying its not very secure, so should only be used on internal (safe) environments and never facing the internet.
set
LISTEN=0.0.0.0
By default get_iplayer downloads tv as mp4, but radio as aac, so I needed to change that option. For neatness I wanted to put all the files in one place (/home/pi/iplayer_media), and tidy the naming, so I used the following commands:
get_iplayer --add-prefs --aactomp3At this point, I could just run the get_iplayer_web_pvr and leave it, but rather than do that I wanted it started whenever the Pi booted up. To do this I found that editing rc.local was simple and worked.
get_iplayer --add-prefs --output "/home/pi/iplayer_media"
get_iplayer --add-prefs --file-prefix "<nameshort><-senum><-episodeshort>"
sudo nano /etc/rc.localAll I needed to do was reboot the pi and I was ready to go.
just before exit 0 add:
su pi -c 'get_iplayer_web_pvr &'
Using the PI
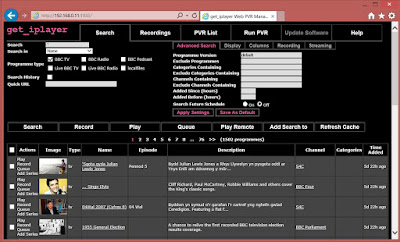
Using my windows machine I opened up my browser and went to http://ip_address_of_the_pi:1935 I was greeted by the web UII enabled the BBC radio checkbox & click the refresh cache button. It opened a new window which updated the cache.
Once I got the results, I could have listened to the shows directly. Clicking on the ‘play’ action gives me a m3u file which I can open with VLC or MPC-HQ (windows media player didn’t work for me though). If you do, it seems to stream via the Raspberry Pi.
But what I wanted was offline playing, so I selected all the items and hit the record button.
THIS WAS SLOOOW. It downloaded the files (in some format) and then had to run ffmpeg to convert them to mp3 files which was rather slow. I estimate it must have taken 10-15 minutes to perform the conversion. But again, it was in a separate window, so I could still carry on.
A look about on the BBC TV side & I found an episode of the Clangers (how can you not like the Clangers?), so clicking on the Record link popped up another window to record that. The TV recordings did not have to be converted it appears, as the time taken was very fast.
Once all the downloads were finished, I clicked on the recordings tab and saw all my downloads:
Clicking on the play/play direct gave me the m3u files, but a ‘right click->save as’ will allow you to get the mp3/mp4 file, though you will need to name it yourself, as it gives it a garbage name.
As an alternative, you can use WinSCP or a similar SFTP client to copy files directly from the Pi.
Conclusion
I could have installed the get_iplayer directly on my PC, but it would have needed to install lots of dependencies on my PC too. At $50, this is an idea task for a Raspberry Pi. Now, all I have to do, is keep an eye on the iplayer for when Doctor Who get posted up.Happy Watching/Listening,
Mark


No comments:
Post a Comment